Debugger tutorial
1 Overview
2 Define the Script interface
3 Create the debugger session
3.1 Define the script interface
3.2 Create the SwingDebugScriptWindow
3.3 Create the Debug session
3.4 Complete code
4 Use the debugger
4.1 Start the debugger
4.2 Add a breakpoint
5 See also
2 Define the Script interface
3 Create the debugger session
3.1 Define the script interface
3.2 Create the SwingDebugScriptWindow
3.3 Create the Debug session
3.4 Complete code
4 Use the debugger
4.1 Start the debugger
4.2 Add a breakpoint
5 See also
This is a basic tutorial which explains how to use the debugger with a Groovy script.
Now right-click on line 5 and select "Add breakpoint":
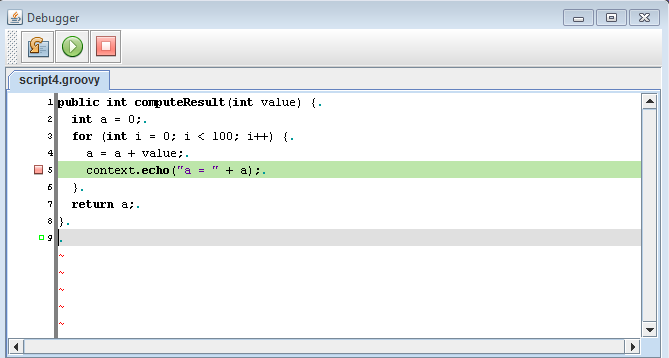
We can now start the debugger, for example by clicking on the button. We will stop on the line with the breakpoint:
If we look on the "Variables" tab, we see:

If we click on the
button again, we see:

Overview
We will define aScript interface, and create a debugger session using the SwingDebugScriptWindow.
Define the Script interface
Our interface will be very simple. We will have the following definition for the interface.public interface Script { public int computeResult(int value) { } }
Create the debugger session
Define the script interface
First we create a Groovy wrapper with our script interface:DebuggingWrapper<Script> wrapper = new GroovyScriptWrapper<Script>() { };
Create the SwingDebugScriptWindow
Then we create aSwingDebugScriptWindow and set it as a Debug listener of the wrapper:SwingDebugScriptWindow debugWindow = new SwingDebugScriptWindow(20, 20); debugWindow.setDefaultCloseOperation(JFrame.EXIT_ON_CLOSE); wrapper.setDebugListener(debugWindow);
Create the Debug session
Finally we get the script, install it, and create the associated Debug session:debugWindow.setVisible(true); JFileChooser chooser = new JFileChooser("Open Script"); chooser.setCurrentDirectory(new File(System.getProperty("user.dir"))); chooser.setDialogType(JFileChooser.OPEN_DIALOG); chooser.setFileSelectionMode(JFileChooser.FILES_ONLY); File file = null; int ret = chooser.showOpenDialog(null); if (ret == JFileChooser.APPROVE_OPTION) { file = chooser.getSelectedFile(); } wrapper.initializeDebugSession(); wrapper.installScript(file); DebugSession<Script> session = wrapper.createDebugSession(); session.setExecutionMode(ScriptWrapper.MODE_NON_BLOCKING); session.setSessionHook(new SessionHook<Script>() { public void start(Script script) { script.computeResult(10); } }); session.startSession();
Complete code
The complete code is:public class DebugTutorial { public void startDebug() throws Exception { DebuggingWrapper<Script> wrapper = new GroovyScriptWrapper<Script>() { }; SwingDebugScriptWindow debugWindow = new SwingDebugScriptWindow(20, 20); wrapper.setDebugListener(debugWindow); debugWindow.setDefaultCloseOperation(JFrame.EXIT_ON_CLOSE); debugWindow.setVisible(true); File file = openScript(); if (file == null) { System.exit(0); } wrapper.initializeDebugSession(); wrapper.installScript(file); DebugSession<Script> session = wrapper.createDebugSession(); session.setExecutionMode(ScriptWrapper.MODE_NON_BLOCKING); session.setSessionHook(new SessionHook<Script>() { public void start(Script script) { script.computeResult(10); } }); session.startSession(); } private File openScript() { JFileChooser chooser = new JFileChooser("Open Script"); chooser.setCurrentDirectory(new File(System.getProperty("user.dir"))); chooser.setDialogType(JFileChooser.OPEN_DIALOG); chooser.setFileSelectionMode(JFileChooser.FILES_ONLY); File file = null; int ret = chooser.showOpenDialog(null); if (ret == JFileChooser.APPROVE_OPTION) { file = chooser.getSelectedFile(); } return file; } public static final void main(String[] args) throws Exception { DebugTutorial tutorial = new DebugTutorial(); tutorial.startDebug(); } }
Use the debugger
We will use for this tutorial the following script:public int computeResult(int value) { int a = 0; for (int i = 0; i < 100; i++) { a = a + value; context.echo("a = " + a); } return a; }
Start the debugger
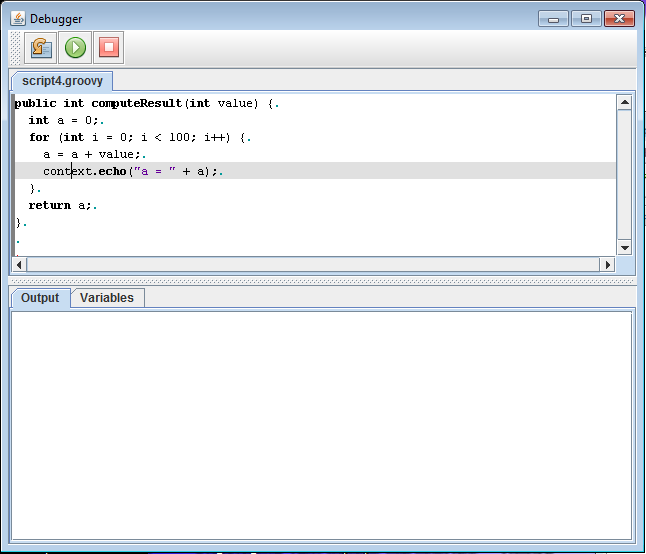
Run theDebugTutorial class and select the script. You should see the following window:
Add a breakpoint
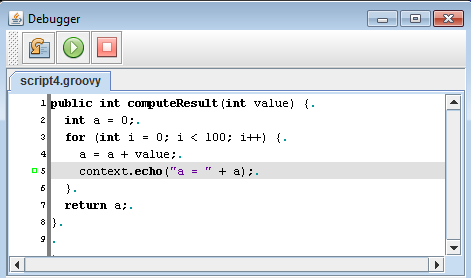
We will add a breakpoint on our script. First show the line numbers by left-clicking on the left border of ther window and moving it to the right:
Now right-click on line 5 and select "Add breakpoint":
We can now start the debugger, for example by clicking on the
button. We will stop on the line with the breakpoint:
If we look on the "Variables" tab, we see:
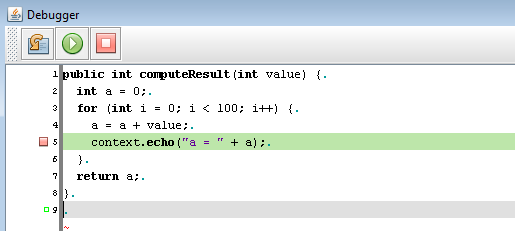
If we click on the
button again, we see:
See also
- Debugging scripts: This article is about the Scripts debugging
×
![]()
Categories: debugging | tutorials